


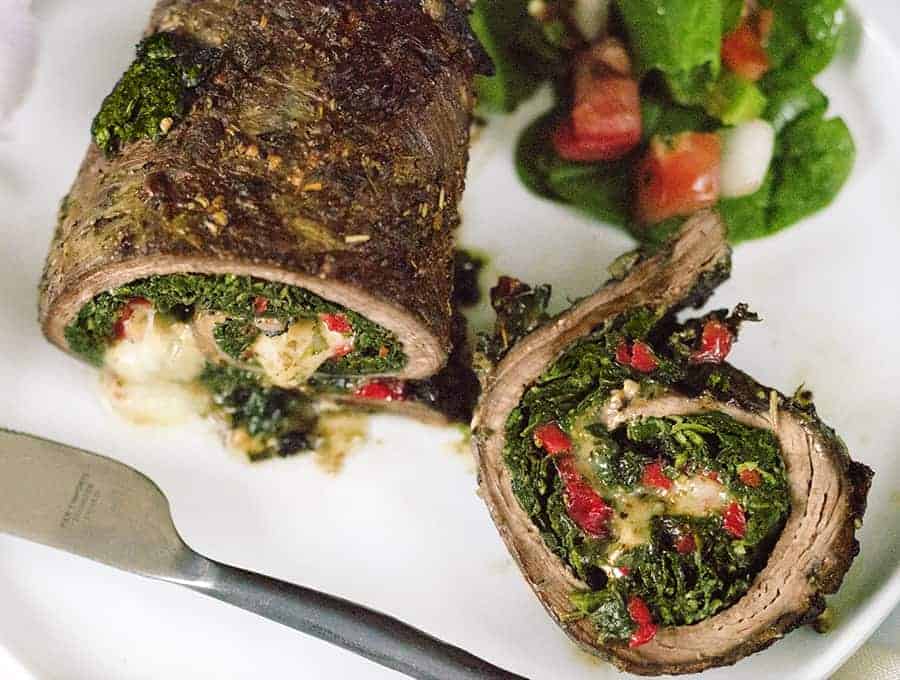
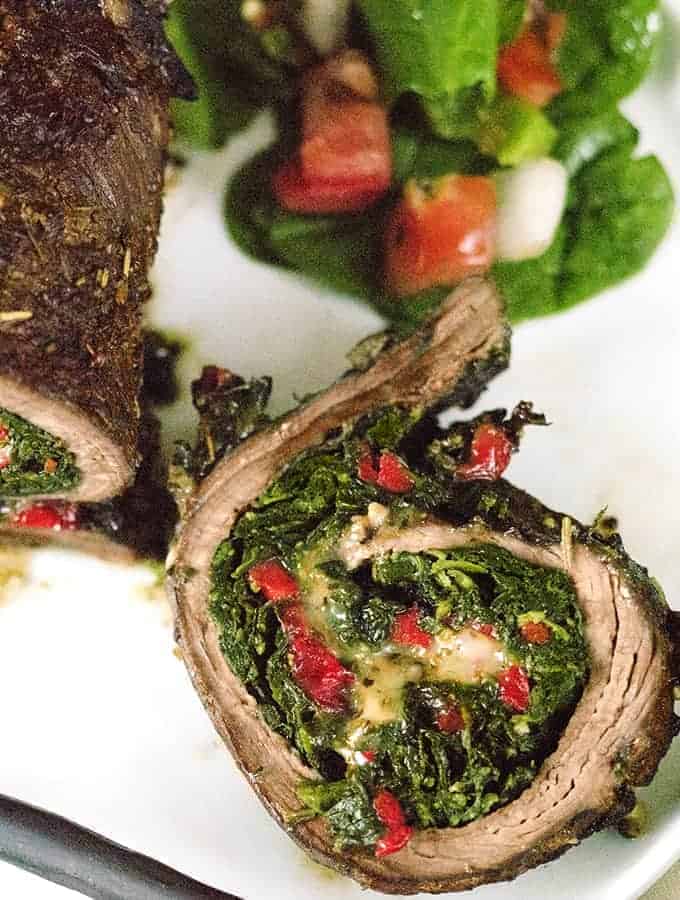
These Italian Stuffed Steak Rolls are stuffed with green spinach, red peppers, gooey Mozzarella cheese, and are made easily in your air fryer! It’s one of those dishes that seems fancy and difficult but is actually a breeze to make.
What Makes These Steak Rolls So Great
Outside of being super fast to make, these Italian Stuffed Steak Rolls only take around 6 ingredients. If you don’t count the salt and pepper, considering you add that to most every savory dish, it only takes 4 ingredients. They look like they take a lot more effort than that, don’t they? Well, I assure you, they don’t take very much effort and are incredibly delicious!
Why Do I Call Them Italian Steak Rolls?
These Italian Stuffed Steak Rolls are so colorful with their green spinach, red peppers, and the gooey white Mozzarella—the same colors as the Italian flag. A coincidence? I think not! Here are the benefits of having a kid who was obsessed with National Flags—I actually remember some of them.
More importantly, though, this is a great way to get meat, cheese, and veggies all in one swoop.
How To Cut Flank Steak For Steak Rolls
I suggest you buy a flank steak and slice it in half horizontally, and use the other half for the German Rouladen-style steak rolls , which will also keep you from having to pound the steak.
Less work and you get a second entire dinner out of the same portion of steak? Definitely a win/win when it comes to this recipe, am I right?
Ingredients You’ll Need
- 1 pound Flank Steak - Flank steak is the star of the dish and serves as the outer wrap for the filling. Its long, flat shape makes it easy to roll, and it becomes tender and flavorful when cooked properly. Pounding it thinner (if needed) helps it cook evenly and hold the filling securely.
- 1 tablespoon Oil - The oil helps sear the steak rolls to create a golden, caramelized crust. It also prevents sticking and helps the seasoning adhere to the surface of the meat.
- 2 teaspoons Minced Garlic - Garlic infuses the steak with bold, aromatic flavor.
- 2 teaspoons Italian Seasoning - It adds a herby, savory profile to the steak and ties the whole Italian theme together.
- 1 teaspoon Salt - Salt enhances the natural flavor of the steak and helps tenderize it slightly.
- 1 teaspoon Ground Black Pepper - Black pepper adds gentle warmth and a subtle bite, deepening the flavor of the seasoned steak.
- 1.5 cups Frozen Spinach - Spinach provides color, texture, and moisture to the filling.
- 1/2 cup Diced Roasted Red Pepper - Roasted red peppers bring sweetness, tenderness, and a smoky flavor to the filling.
- 1 cup Shredded Mozzarella Cheese - Mozzarella acts as the creamy, melty binder for the filling. It helps hold everything together inside the steak roll and adds classic Italian comfort-food flavor.
How To Make Steak Rolls
- Place the flank steak into a bowl. Add oil, Italian seasoning, garlic, salt, and pepper. Mix well to ensure the steak is covered with the seasonings. Allow the steak to marinate for 30 minutes, or up to 24 hour in the refrigerator.
- Place the steak on a flat surface.
- Spread the spinach evenly over steak, leaving a 1/4 inch border at the edge. Cover with red pepper, and then cheese.
- Roll up the steak as tightly as you can, ending seam side down. Using a sharp knife, cut the roll in half so that you can better fit it into your air fryer basket.
- Set your air fryer to 400F for 8-10 minutes, or until your steak has reached an internal temperature of 145F. It is critical to not overcook skirt steak, so as to not toughen the meat.
- Let the steak rest for 10 minutes and serve.
Tips And Tricks
Italian stuffed steak rolls look impressive but are surprisingly simple to prepare. These tips will help you get perfectly rolled, evenly cooked, and ultra–flavorful results every time.
- When rolling the steak, make sure the grain of the meat is running horizontally. This makes it easier to roll as well as it makes it less likely that it will unravel while it’s cooking.
- If you have trouble getting the rolls to stay rolls, you can use toothpicks to ensure that they hold together while cooking them. Just don’t forget to remove the toothpicks before serving them.
- If the cut of flank steak you have is too thick, you can butterfly the flank steak (cut it in half horizontally). It also helps if you pound the meat flat with a meat tenderizer, rolling pin or whatever else you have in your kitchen that works as a makeshift tenderizer.
- I suggest you buy a flank steak and slice it in half horizontally, and use the other half for the German Rouladen-style steak rolls , which will also keep you from having to pound the steak.
Variations
Italian stuffed steak rolls are wonderfully versatile, and with just a few simple swaps or additions, you can customize the flavors to match your tastes or what you have on hand.
- Prosciutto & Provolone Rolls - Layer thin slices of prosciutto and provolone inside the steak for a salty, smoky, and extra-cheesy twist.
- Mushroom & Spinach Filling - Sauté 1 cup of finely chopped mushrooms with garlic and mix them into the spinach for a richer, earthier flavor.
- Pesto-Stuffed Steak Rolls - Spread 2–3 tablespoons of basil pesto over the steak before adding the filling for a fragrant, herb-packed upgrade.
What To Eat With Stuffed Steak Rolls
Italian stuffed steak rolls are rich, flavorful, and satisfying on their own, so pairing them with the right sides can help round out the meal and highlight their savory stuffing.
- Garlic Mashed Potatoes - Creamy, buttery mashed potatoes with a hint of garlic make a comforting base for the steak rolls and soak up the flavorful juices.
- Roasted Asparagus or Broccoli - Lightly roasted green vegetables tossed with olive oil, salt, and pepper add freshness and a crisp texture to the plate.
- Herbed Couscous or Orzo - A fluffy bed of couscous or orzo tossed with a little parsley, lemon zest, and olive oil offers a bright, easy side that complements the richness of the steak.
How Long Do They Last?
Italian stuffed steak rolls store quite well, making them great for meal prep or leftovers. Once cooked, they can be kept in an airtight container in the refrigerator for 3 to 4 days.
To maintain the best texture, reheat the rolls gently in the oven or on the stovetop rather than microwaving, which can make the steak slightly tough.
If you’re planning ahead, you can also prepare the rolls up to a day in advance, keep them tightly wrapped in the fridge, and cook them when you’re ready.
Can You Freeze Them?
Yes, you can freeze air fryer Italian flank steak rolls, and they hold up surprisingly well due to their sturdy filling and tightly rolled structure.
For the best results, let the cooked steak rolls cool completely, then wrap each roll individually in plastic wrap or foil to prevent freezer burn. Place the wrapped rolls in a freezer-safe container or zip-top bag, removing as much air as possible. They will keep well for up to 2–3 months.
When you’re ready to enjoy them, thaw the rolls overnight in the refrigerator, then reheat gently in the air fryer or oven until warmed through.
More Delectable Italian Dishes
- Check out my Tuscan Ribollita Bean Soup . It’s a wonderfully filling and hearty soup that’s bursting with flavor!
- This Italian Sausage Soup recipe gives you all the flavors of Zuppa Toscana without all the carbs!
- My Instant Pot Zucchini Lasagna Recipe is another great way to get your Italian food fix while keeping things keto friendly.
- This Tuscan Chicken recipe is creamy, garlicky, comforting chicken perfection! It’s one of those dishes that you won’t be able to stop eating, and it’s low carb as well so you don’t have to feel guilty for doing so!
Air Fryer Steak Rolls | Italian Stuffed Steak Roll Recipe
Equipment
- Ninja Air Fryer
Ingredients
- ▢ 1 pound flank steak , about 1/4-1/2 inch thick
- ▢ 1 tablespoon Oil
- ▢ 2 teaspoons Minced Garlic
- ▢ 2 teaspoons Italian Seasoning
- ▢ 1 teaspoon Kosher Salt
- ▢ 1 teaspoon Ground Black Pepper
For the filling
- ▢ 1.5 cup Frozen Spinach , defrosted
- ▢ 1/2 cup diced roasted red pepper
- ▢ 1 cup shredded mozzarella cheese
Instructions
Place the flank steak into a bowl. Add oil, Italian seasoning, garlic, salt, and pepper. Mix well to ensure the steak is covered with the seasonings. Allow the steak to marinate for 30 minutes, or up to 24 hour in the refrigerator.
Place the steak on a flat surface.
Spread the spinach evenly over steak, leaving a 1/4 inch border at the edge. Cover with red pepper, and then cheese.
Roll up the steak as tightly as you can, ending seam side down. Using a sharp knife, cut the roll in half so that you can better fit it into your air fryer basket.
Set your air fryer to 400F for 8-10 minutes, or until your steak has reached an internal temperature of 145F. It is critical to not overcook skirt steak, so as to not toughen the meat.
Let the steak rest for 10 minutes and serve.
When rolling the steak, make sure the grain of the meat is running horizontally. This makes it easier to roll as well as it makes it less likely that it will unravel while it’s cooking.
If you have trouble getting the rolls to stay rolls, you can use toothpicks to ensure that they hold together while cooking them. Just don’t forget to remove the toothpicks before serving them.
If the cut of flank steak you have is too thick, you can butterfly the flank steak (cut it in half horizontally). It also helps if you pound the meat flat with a meat tenderizer, rolling pin or whatever else you have in your kitchen that works as a makeshift tenderizer.
I suggest you buy a flank steak and slice it in half horizontally, and use the other half for the German Rouladen-style steak rolls , which will also keep you from having to pound the steak.
Get support & connect with our community on Facebook!
Nutrition

If you already signed up, you should have received an email with a password to give you unlimited access to our FREE Printable Library. The password is case sensitive. Enter it below and get printing!
Password:
Air Fryer Steak Rolls | Italian Stuffed Steak Roll Recipe
Ingredients
- 1 pound flank steak about 1/4-1/2 inch thick
- 1 tablespoon Oil
- 2 teaspoons Minced Garlic
- 2 teaspoons Italian Seasoning
- 1 teaspoon Kosher Salt
- 1 teaspoon Ground Black Pepper
For the filling
- 1.5 cup Frozen Spinach defrosted
- 1/2 cup diced roasted red pepper
- 1 cup shredded mozzarella cheese
Instructions
Place the flank steak into a bowl. Add oil, Italian seasoning, garlic, salt, and pepper. Mix well to ensure the steak is covered with the seasonings. Allow the steak to marinate for 30 minutes, or up to 24 hour in the refrigerator.
Place the steak on a flat surface.
Spread the spinach evenly over steak, leaving a 1/4 inch border at the edge. Cover with red pepper, and then cheese.
Roll up the steak as tightly as you can, ending seam side down. Using a sharp knife, cut the roll in half so that you can better fit it into your air fryer basket.
Set your air fryer to 400F for 8-10 minutes, or until your steak has reached an internal temperature of 145F. It is critical to not overcook skirt steak, so as to not toughen the meat.
Let the steak rest for 10 minutes and serve.
When rolling the steak, make sure the grain of the meat is running horizontally. This makes it easier to roll as well as it makes it less likely that it will unravel while it’s cooking.
If you have trouble getting the rolls to stay rolls, you can use toothpicks to ensure that they hold together while cooking them. Just don’t forget to remove the toothpicks before serving them.
If the cut of flank steak you have is too thick, you can butterfly the flank steak (cut it in half horizontally). It also helps if you pound the meat flat with a meat tenderizer, rolling pin or whatever else you have in your kitchen that works as a makeshift tenderizer.
I suggest you buy a flank steak and slice it in half horizontally, and use the other half for the German Rouladen-style steak rolls , which will also keep you from having to pound the steak.
Air Fryer Steak Rolls | Italian Stuffed Steak Roll Recipe https://twosleevers.com/italian-stuffed-steak-rolls/
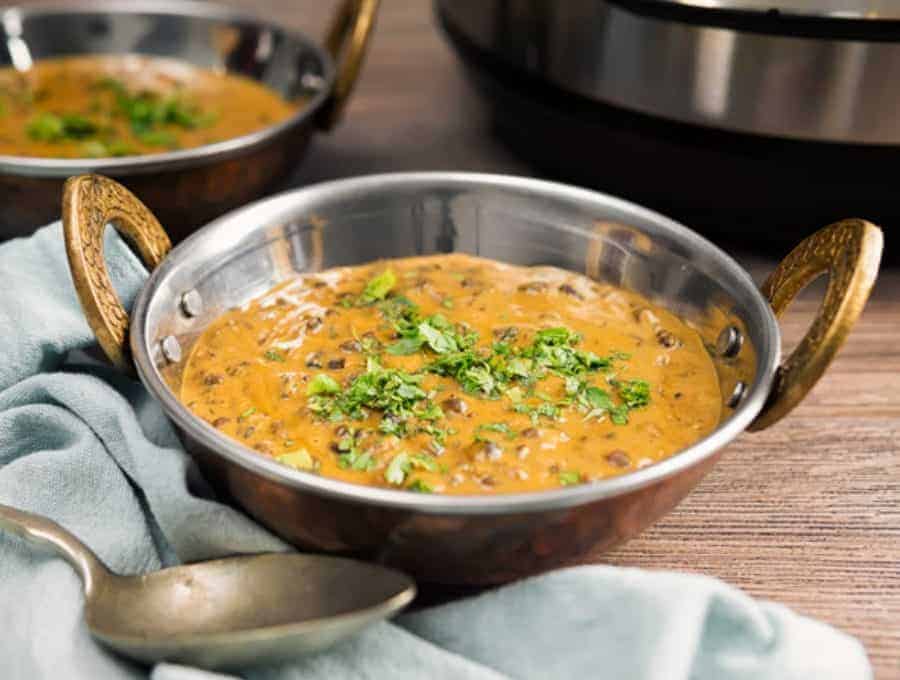
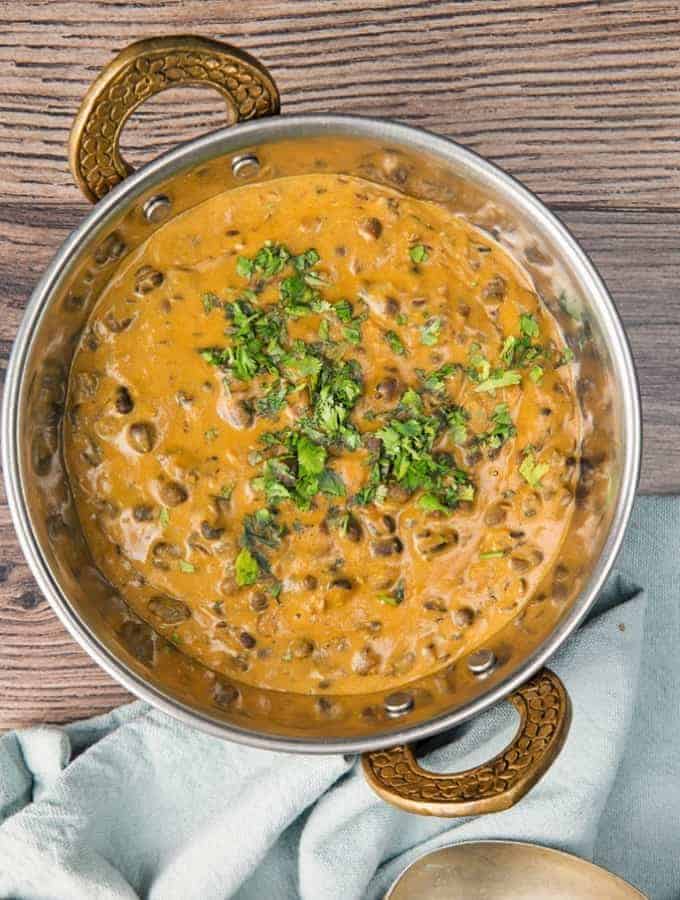
Instant Pot Dal Makhani is a creamy Indian lentil curry made with whole black urad dal, bay leaves, garlic, ginger, turmeric, coriander, garam masala, tomato paste, and water, then finished with Greek yogurt, half and half, and ghee. It’s traditional and works well for a comforting vegetarian dinner when you want restaurant-style buttery lentils with less hands-on time. Unlike classic stovetop dal makhani that needs long simmering and constant attention, this version uses pressure cooking for the lentils and a quick ghee cumin tadka finish to deliver rich flavor fast.
Why You HAVE To Try These Creamy Lentils
- Quick. This Instant Pot recipe is fast compared to the time it takes to cook lentils on the stovetop, this dal recipe is incredibly quick to make.
- Easy. Barely more effort than your typical pour and cook recipe .
- Authentic. All of the flavors of your favorite Indian dishes .
- Vegetarian . Have a tasty, filling meal without adding meat.
Unless you LOVE to spend all day cooking so that you can eat everything you made in five minutes, you will want to make Dal Makhani according to my super simple recipe.
Dal Makhani has traditionally required hours and hours of very slow cooking to get the lentils to a perfectly soft, creamy cooked stage. Thankfully, the Instant Pot does a fine job of this, although it does take a bit.
I made 1/2 a cup of lentils for about 2-2.5 cups of finished dal, and I set the lentils to cook for about 30 minutes. They were perfect when they were done.
What Is Dal Makhani?
Dal Makhani is a rich and creamy North Indian lentil dish made primarily from whole black lentils ( urad dal ). This dish features a luscious blend of spices, ghee, and cream that creates its signature velvety texture.
When made in the Instant Pot, Dal Makhani captures the same authentic taste in a fraction of the time, producing a comforting, flavorful meal.
What Does It Taste Like?
The first thing you will notice with your first bite of this Dal Makhani recipe is how incredibly creamy it is. Between the perfectly cooked dal and cream added as a finishing touch, it is velvety smooth.
Next, you will notice the lovely flavors of the spices used to make this one of the most popular Indian dishes . There is the slightest bit of spice from the garam masala and cayenne but it is quickly masked by the rich flavors of the cumin , coriander , and turmeric.
Is Dal Makhani Healthy?
Thanks to the high fiber and plant protein content of dal, this recipe is considered quite healthy. If you’re looking for a way to increase these things in a Vegetarian or Vegan diet, Dal Makhani is the perfect recipe for you.
If you’re concerned about keeping carbohydrates and natural fats low in your diet, you may want to avoid this recipe, as it has 16g carbs and 6g fats per serving.
What Do You Need To Make It?
Ok, I know that the list below seems extremely lengthy, especially for a recipe you’ve never tried before. Rest assured that a majority of the ingredients you will need are spices that you likely already have (or should totally already have for some other tasty dishes) in your pantry.
- 1/2 cup whole black urad dal - The heart of the dish. These whole black lentils (also called urad dal sabut ) create the creamy, velvety texture Dal Makhani is known for.
- 2 bay leaves - Added while cooking the lentils, bay leaves infuse a mild earthy aroma and subtle warmth.
- 1 tablespoon minced garlic - Provides a savory depth and aromatic richness.
- 2 teaspoons minced ginger - Adds a touch of heat and brightness that complements the garlic.
- 1 teaspoon salt - Brings out the natural flavors of the lentils and spices.
- 1/2 teaspoon turmeric - Gives the dal a warm golden hue and a subtle earthy flavor.
- 1/2 teaspoon ground coriander - Adds citrusy, nutty notes that deepen the flavor of the dal.
- 1/2 teaspoon Punjabi garam masala - A key warming spice blend made from cumin, cloves, cinnamon, and cardamom. It adds the authentic Indian flavor and aroma.
- 1/4 teaspoon cayenne pepper - Provides gentle heat and a touch of color.
- 1/4 teaspoon ground cumin - Adds warm, earthy, and slightly smoky undertones that give the dal its depth and balance.
- 1.5 cups water - The cooking liquid that softens the lentils.
- 1/4 cup full-fat Greek yogurt - Adds creaminess, tang, and body to the dish.
- 1/2 cup half and half - This is what gives Dal Makhani its signature rich, buttery texture.
- 2 teaspoons ghee - Used at the end for tempering.
- 1 teaspoon cumin seeds - Bloomed in hot ghee to release their earthy, toasty aroma.
- 1 tablespoon tomato paste - Adds a concentrated tomato flavor and slight acidity that balances the creaminess of the lentils and yogurt.
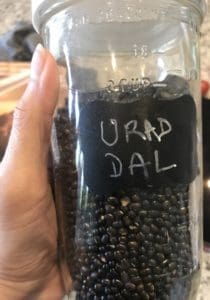
Which Type of Urad Dal Is Needed for Instant Pot Dal Makhani
You need a particular kind of dal for this called Urad Dal. To add to the confusion, Urad dal can be either split or whole. You need the whole kind . Here’s what it looks like.
And here’s why you can’t just tell me “Oh I love dal” or “I hate dal” Because I’m going to ask you which KIND of dal do you love/hate? These are just a FEW of the dals I have at home.
So the one to the left, labeled Urad (pictured below)? (Actually, I just realized I labeled it Udad, doh! I need to fix that). The creamy white one ? It’s this same black Urad I have up there, except split and the skin has been peeled off (don’t ask me how. I don’t know).
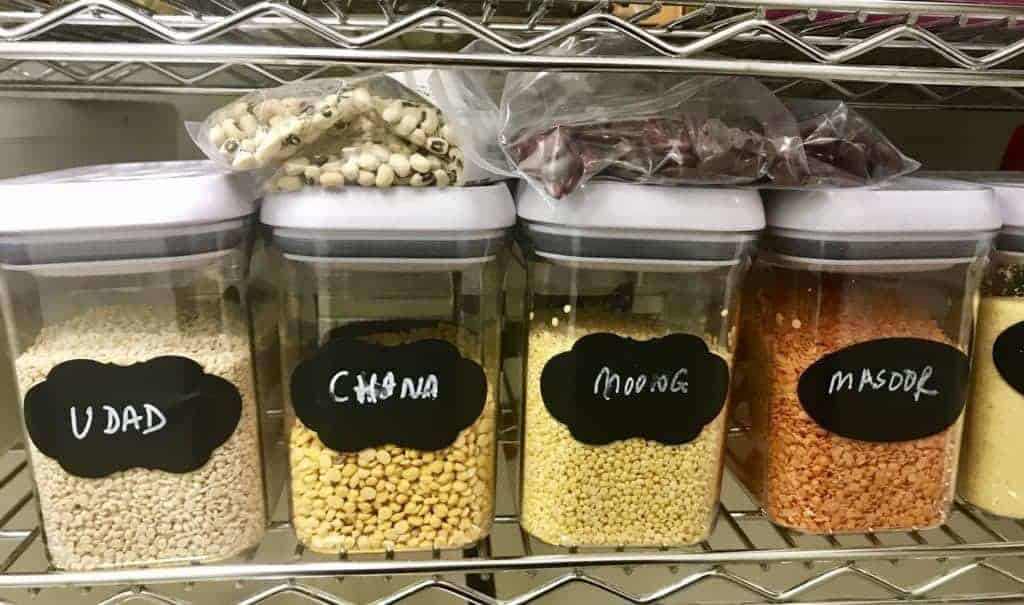
Hard to believe they’re the same right?
This is one of those dals that’s quite thick, but it gets its thickness, not from the typical onion masala that thickens many Indian dishes, but rather from some of the dal itself breaking down and adding a thickness to the finished product.
There are many complicated recipes for this dal on the internet, but I like to keep it simple, yet authentic. Most of us with jobs, families, children just really don’t have the time to do all the steps most of the recipes call for.
For more info on how to cook beans and lentils in your pressure cooker, check out my guide on How to Cook Beans in the Instant Pot !
Watch the Video
Which Garam Masala Is Needed For Dal Makhani
But there is one thing I’d urge you to consider taking the extra step for here, which is making the Punjabi Garam Masala. This is a little different from the other Garam Masala recipe I’ve posted here, although both are super easy and only require you to grind dry spices together. This one is different in that it provides what we refer to in my house as “chest heat”.
This dal is a particular favorite during winter, so warming your chest with the spices makes sense I suppose.
I can tolerate a lot of “mouth heat” from the cayenne. But I actually can’t tolerate as much “chest heat” (from cinnamon, cloves, etc), or “nasal heat” (from horseradish, wasabi etc.). If you’re just not sure if you’ll love this dal, then just use whatever Garam masala you have or make your own with this recipe .
Want A More Efficient Way To Make This Dal Makhani?
I decided to be #lazyefficient and mix the spices into the dal itself and cook it that way. You can follow what’s in the video (same as the cookbook), or my more streamlined instructions below, and still get a wonderful Dal Makhani either way.
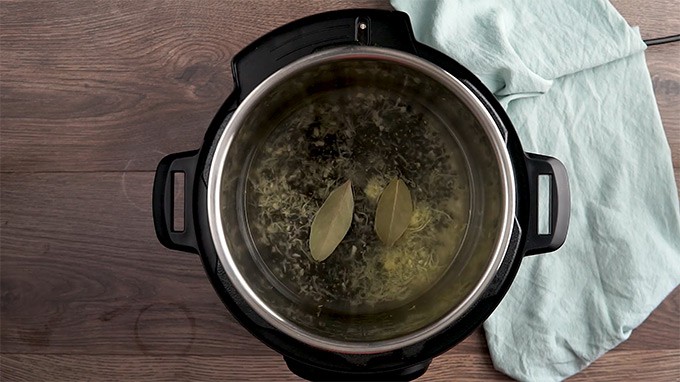
How To Make Dal Makhani
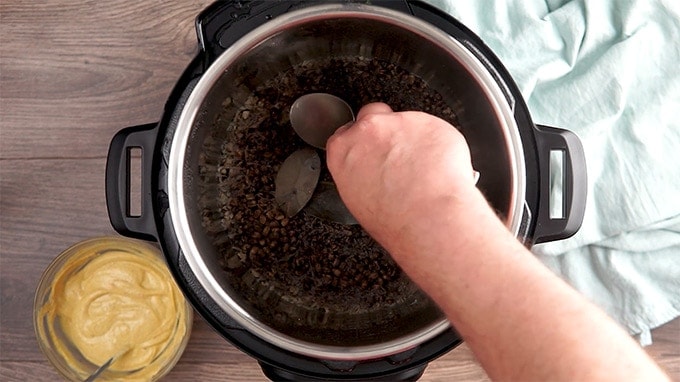
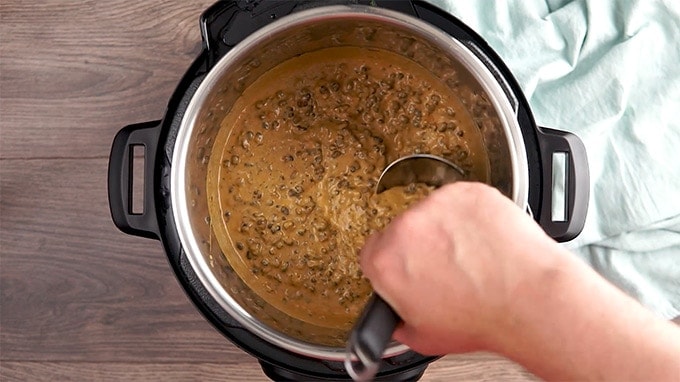
- Add dal, bay leaves, garlic, ginger, and water to your Instant pot and cook for 30 minutes under high pressure. Allow to naturally release.
- Once the dal is cooked, mash it with the back of a spoon. You are doing this to make the dal very creamy and thick.
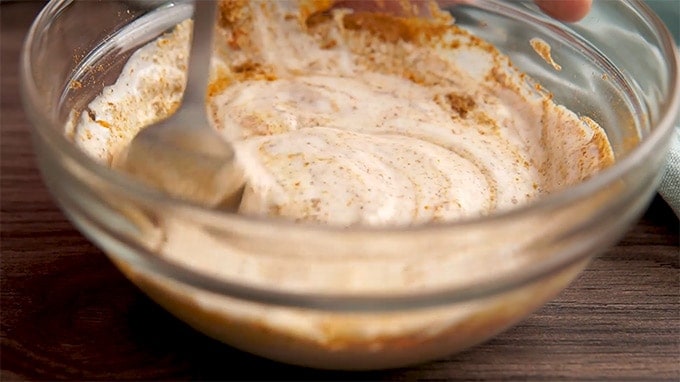
- Meanwhile, mix the yogurt with the remaining spices.
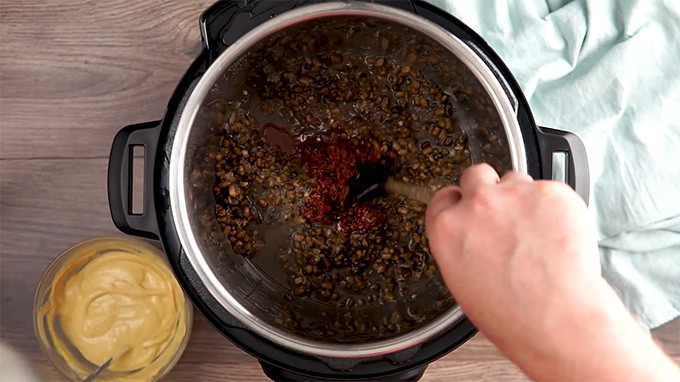
- Heat a small saucepan or a tadka ladle and add ghee. To the hot ghee, add cumin seeds, and tomato paste and cook for a little bit.

- Add the tomato paste mixture to the dal.
- Add the yogurt and half and half mixture to the dal.
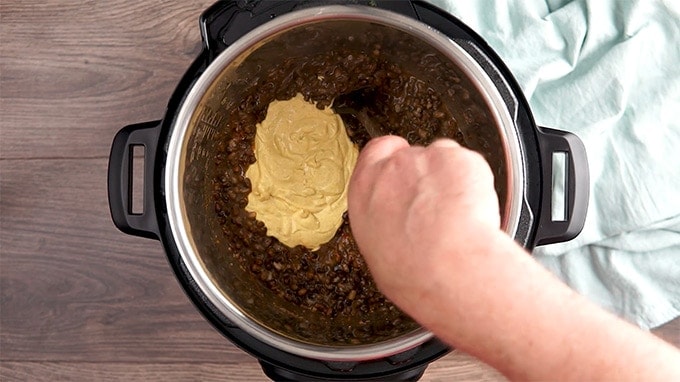
- Add a little water if needed, and serve with rice, chappatis, or basmati pilau.
- ENJOY!
Tips and Tricks
Making Instant Pot Dal Makhani is one of the easiest ways to enjoy this rich, creamy Indian classic without spending hours at the stove. Using the Instant Pot ensures the lentils cook perfectly tender while the spices infuse deeply for that authentic restaurant-style flavor. Here are some helpful tips and tricks to make your dal turn out perfectly every time:
- Use whole black urad da l. If you need to use split urad dal , cook for 10 minutes under pressure.
- You do not need to soak the ural dal. You can just cook it from dry without any prep.
- I ask you to mash the dal with the back of a spoon. This is so that you can have a nice, thick, creamy dal.
- If you are vegan or dairy-free, you can use soy yogurt, coconut oil, and coconut cream in place of the yogurt, ghee, and half and half. We know this works because Joey Leone made it and I saw the video of the finished product and it looks perfect! (Thank you, Joey!)
- This dal freezes very well, and tastes even better the next day so make extra!
- Ideally, you would use Punjabi gram masala for this recipe. If you don’t want to, you can use my regular Garam Masala recipe for it. If you don’t want to make it, I recommend this one.
Variations
Perfect! Offering variations helps readers tailor Instant Pot Dal Makhani to their dietary preferences or flavor preferences. Here are some delicious and practical ideas:
- Spicy - Add extra green chilies, a teaspoon of red chili powder, or a dash of cayenne pepper.
- Lighter - Reduce the ghee by half and skip the cream entirely. Instead, puree a small portion of the cooked lentils and stir it back in for natural creaminess without extra calories.
- Vegan - Replace butter with coconut oil or vegan butter and use full-fat coconut milk instead of heavy cream.
What To Serve With Creamy Indian Lentils
Instant Pot Dal Makhani is rich, creamy, and full of deep, comforting flavors. It’s the kind of dish that pairs beautifully with a variety of sides and accompaniments. Whether you’re planning a full Indian meal or keeping things simple, these pairings will help you create the perfect balance of taste and texture:
- Basmati Rice - The most traditional and beloved pairing. Fluffy, fragrant basmati rice soaks up the creamy dal perfectly.
- Raita - A cool yogurt-based side with cucumber, mint, and cumin that balances the spice and richness of the dal.
- Naan or Roti - Soft, warm naan or whole wheat roti are ideal for scooping up every last bite. Garlic naan or butter naan adds an extra layer of richness.
You do not have to soak whole urad dal for dal makhani, especially for this Instant Pot version. If you want to use a different cooking method, soaking makes a big difference in how quickly the lentils cook and how creamy the final buttery lentils turn out. If you soak whole urad dal for several hours or overnight, you get softer skins and a smoother restaurant style dal makhani with less pressure cooking time. If you skip soaking, you can still make Instant Pot dal makhani, but plan on a good mash or whisk at the end to build that classic creamy texture.
To make dal makhani taste like a restaurant, focus on depth and finish by using whole urad dal cooked until very soft, then mash some lentils to make it naturally creamy and let it simmer so the flavors concentrate. Build richness with ghee or butter, add tomato paste and spices like garam masala and Kashmiri chili for color, and finish with cream or a little yogurt added on low heat so it does not curdle. A final tadka and a pinch of kasuri methi right before serving adds the signature Punjabi aroma that makes buttery lentils taste restaurant style.
Dal makhani is often not creamy because the whole urad dal was not cooked soft enough, not soaked long enough, or not simmered and mashed to break down the lentils into a smooth base. If the water ratio is too high, the dal stays thin, and if you skip the finishing fat like ghee, butter, and cream, it can taste watery instead of like restaurant style buttery lentils. For a creamier Instant Pot dal makhani, pressure cook until the lentils are very tender, mash or whisk a portion, simmer to reduce, and add cream and yogurt on low heat at the end so it stays rich without curdling.
Want More Easy Dal Recipes?
- Definitely watch the video and the method for making Pressure cooker dal and rice at the same time.
- If you like creamy dals (which I ADORE btw), then you want to make this fantastic Pressure cooker Langarwali dal for sure.
- You want a light soup that’s more Western than Indian, try this Instant Pot Red lentil soup .
- If you want spinach and lentils together, you will like this Instant Pot Lentil soup
If you love this Dal Makhani Instant Pot recipe as much as I do, make sure you share it with your friends on Facebook and Pinterest so they can try it too.

Dal Makhani Creamy Lentils | Dal Makhani Instant Pot Recipe
Equipment
- Instant Pot
- Tadka Ladle
- INSTANT POT DUO 6 QUART
- Small Sauce Pan
- measuring cup
- Measuring Spoons
Ingredients
Cook Under High Pressure
- ▢ 1/2 cup ( 100 g ) whole black urad dal , (see picture)
- ▢ 2 ( 2 ) Bay Leaves
- ▢ 1 tablespoon ( 1 tablespoon ) Minced Garlic
- ▢ 2 teaspoons ( 2 teaspoons ) Minced Ginger
- ▢ 1 teaspoon ( 1 teaspoon ) Kosher Salt
- ▢ 1/2 teaspoon ( 0.5 teaspoon ) Turmeric
- ▢ 1/2 teaspoon ( 0.5 teaspoon ) Ground Coriander
- ▢ 1/2 teaspoon ( 0.5 teaspoon ) Punjabi garam masala , (see recipe below) or ordinary garam masala
- ▢ 1/4 teaspoon ( 0.25 teaspoon ) Cayenne Pepper
- ▢ 1/4 teaspoon ( 0.25 teaspoon ) Ground Cumin
- ▢ 1.5 cups ( 625 g ) Water
Mix Together
- ▢ 1/4 cup ( 50 g ) Full-Fat Greek Yogurt , (or drained soy yogurt)
- ▢ 1/2 cup ( 121 g ) Half and Half , cream, or alternative milk of your choice, or cashew paste
For Finishing
- ▢ 2 teaspoon ( 2 teaspoon ) Ghee , (Earth Balance for non-diary)
- ▢ 1 teaspoon ( 1 teaspoon ) cumin seeds
- ▢ 1 tablespoon ( 1 tablespoon ) Tomato Paste
Instructions
- Wash the dal well and drain.
- Add dal, bay leaves, gingerf, garlic, and water to your Instant Pot.
- Set the Instant pot or pressure cooker to high pressure for 30 minutes. Allow the pot to release pressure naturally for 10 minutes, and then release all remaining pressure.
- Meanwhile, mix together the yogurt, remaining spices, and milk/cream of choice.
- When the dal is ready, open up the Instant Pot and using the back of a spoon, gently mash in some of the dal to make a thicker dal, leaving most of the dal intact.
- Turn your Instant Pot onto its Keep Warm Setting, adding a little water if needed.
- Heat a small saucepan or tadka ladle, add ghee when hot, and add in the cumin seeds which will start to sputter.
- Put in the tomato paste and cook it for a while, until it absorbs all of the ghee.
- Pour this paste into the dal and mix well.
- Pour in your yogurt mixture and mix well, garnish with chopped cilantro if desired, and serve with naan, chappatis, or rice, or eat plain by the spoonful, which is what I do.
Watch The Video
- Use whole black urad da l. If you need to use split urad dal , cook for 10 minutes under pressure.
- You do not need to soak the ural dal. You can just cook it from dry without any prep.
- I ask you to mash the dal with the back of a spoon. This is so that you can have a nice, thick, creamy dal.
- If you are vegan or dairy-free, you can use soy yogurt, coconut oil, and coconut cream in place of the yogurt, ghee, and half and half.
- This dal freezes very well, and tastes even better the next day so make extra!
- Ideally, you would use Punjabi gram masala for this recipe. If you don’t want to, you can use my regular Garam Masala recipe for it. If you don’t want to make it, I recommend this one.
Get support & connect with our community on Facebook!
Nutrition
Don’t forget to check out my otherBest-selling Instant Pot Cookbooks!
Indian Instant Pot , Keto Instant Pot, Instant Pot Fast and Easy , Healthy Instant Pot & Vegetarian Instant Pot .

