
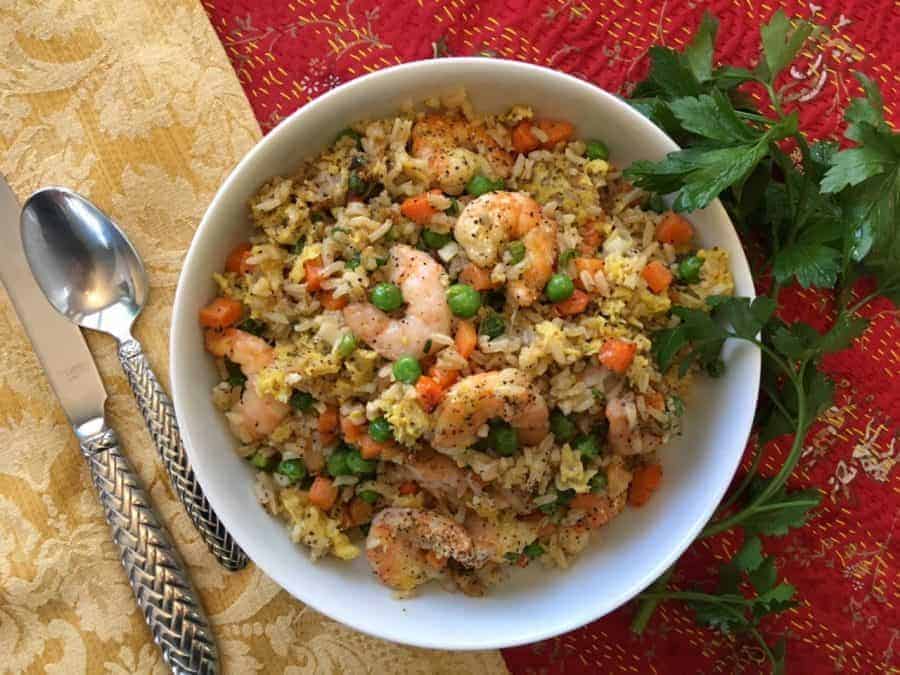
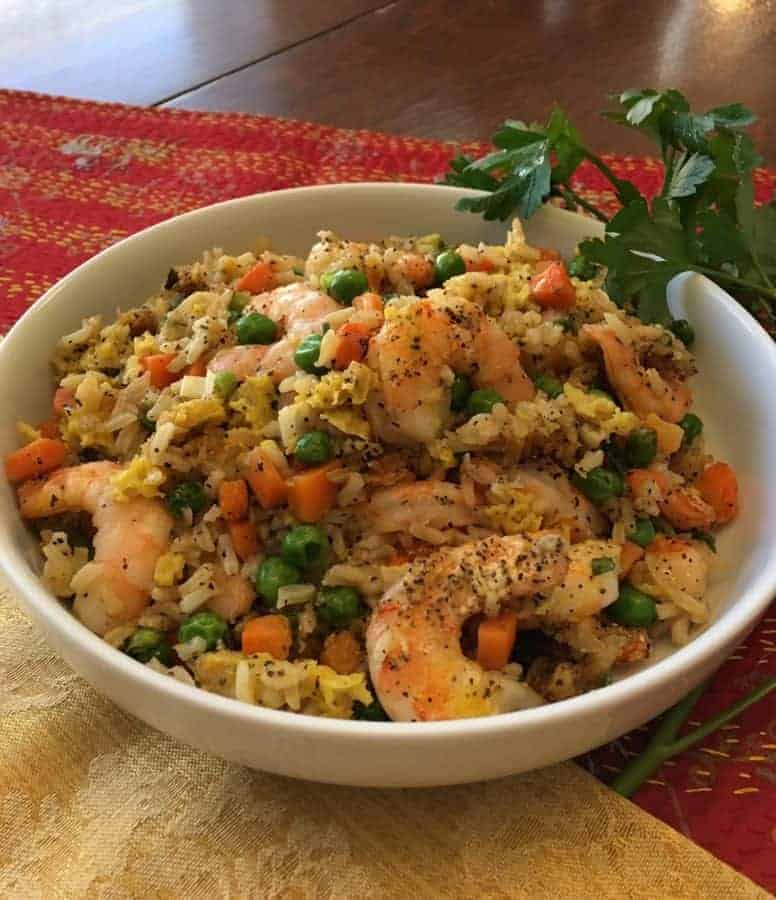
This Air Fryer Shrimp Fried Rice is easily made in the Air Fryer in about 30 minutes . It’s a healthy shrimp dinner with simple ingredients that pack so much flavor from the soy sauce and sesame oil and a nice fresh bite from the green onions.
Why You’ll Love This Awesome Air Fryer Recipe
I Can Make Fried Rice In The Air Fryer?
Yes, you absolutely can. I have several recipes that make fried rice in my Instant Pot and Air Fryer because of how quick, easy, and how much healthier it is. You should try my Nigerian Fried Rice or Korean Beef Bowl recipes. They’re both made quick and easy without all of the hassles.
What Are The Best Veggies For Shrimp Fried Rice?
Any frozen vegetable combination you have on hand will work with this shrimp and rice recipe , and you probably have a bag you have forgotten about and don’t know what to do with it. Now you do!
How Many Calories Are In Air Fryer Shrimp Fried Rice
Less than 400 calories making this a great healthy weeknight dinner. The tricky thing with rice and keeping calorie intake down is to use an actual measuring cup when plating your meal.
How Can I Make This Low Carb?
Two things you can do here to make this a low carb recipe. One, omit the cornstarch on the shrimp. Season with just pepper and follow the recipe. The flavor will come from the rice ingredients. Soy sauce is naturally salty, so it is okay to skip the salt on the shrimp. Plus the natural shrimp flavor will peek through.
The second thing you can do to make a low carb shrimp fried rice is to use cauliflower rice rather than white or brown rice. Start the recipe with raw defrosted cauliflower rice. Heat the air fryer to 350 and cook 5 minutes, then add shrimp and veggies, cook 5 minutes, and lastly the egg for the last 5 minutes. You’ve just made this a 15 minute meal and saved on carbs. Win!
Ingredients You’ll Need
- 1 pound Shrimp - This is the star protein of the dish. Peeled and deveined shrimp cook quickly in the air fryer, becoming tender and juicy while adding a sweet, briny flavor to the fried rice.
- 1/4 teaspoon Pepper - Adds a light layer of seasoning to the shrimp, giving it warmth and a subtle bite.
- 1 teaspoon Cornstarch - Creates a light coating on the shrimp that helps them crisp slightly in the air fryer and lock in moisture. It also assists in browning.
- 2 cups Cooked Rice - The base of the fried rice. Cold, day-old rice works best because it’s drier and becomes perfectly chewy and crisp when air-fried.
- 1 cup Frozen Peas and Carrots - Adds classic fried-rice vegetables for color, sweetness, and texture. Thawing prevents excess moisture, which helps the rice crisp.
- 1/4 cup Chopped Green Scallions - Provides fresh, oniony brightness. Some go into the rice for flavor; the rest can be used as garnish.
- 3 tablespoons Sesame Oil - Gives the rice its signature nutty, aromatic flavor while helping it crisp and brown in the air fryer.
- 1 tablespoon Soy Sauce - Adds savory umami depth and also lightly colors the rice. It’s the main seasoning that ties all the fried-rice flavors together.
- 1/2 teaspoon Salt - Enhances all the flavors in the rice without overpowering the soy sauce.
- 1 teaspoon Pepper - Adds mild heat and balances the richness of the sesame oil.
- 2 large Eggs - Creates the classic scrambled egg component found in fried rice. The eggs add protein, richness, and fluffy texture throughout the dish.
I love frozen shrimp for the accessibility and it is already peeled and deveined for this shrimp stir fry recipe . If you find frozen shrimp on sale, buy an extra bag to have when you need an easy weeknight dinner on the table.
How To Make Shrimp Fried Rice
- Toss the thawed shrimp with pepper and cornstarch. Set aside.
- In an ovenproof pan, combine the leftover rice with the soy sauce, sesame oil, salt, pepper, frozen veggies, and green onions.
- Set the Air Fryer at 350 for 15 minutes. Make sure to toss the rice and veggie mixture halfway.
- Add the shrimp to the top of the rice and veggie mixture and cook for 5 minutes.
- Add the beaten eggs and cook an additional 5 minutes. Stir the eggs into the shrimp fried rice.
- Enjoy!
Tips and Tricks
Creating restaurant-style fried rice in the air fryer is easy when you follow a few smart techniques to maximize flavor and texture.
- Use leftover rice. It is best to use leftover rice to make any stir fry recipe.
- Try frozen shrimp. Use frozen shrimp that is already peeled and deveined for quicker cooking.
- Don’t Skip the Cornstarch on the Shrimp . A light coating of cornstarch helps the shrimp develop a slight crust, giving the dish better texture and preventing the shrimp from drying out during air frying.
Variations
Fried rice is incredibly versatile, and the air fryer makes it even easier to mix and match ingredients. Try one of these tasty variations to keep the recipe fresh and exciting.
- Chicken Fried Rice - Swap the shrimp for 1 pound of diced chicken thighs or breasts. Season the same way with pepper and cornstarch, then air fry until cooked through before adding the rice mixture.
- Veggie Fried Rice - Leave out the shrimp and load up on vegetables like bell peppers, zucchini, mushrooms, or broccoli. This is a great meatless option that still feels hearty.
- Pork or Bacon Fried Rice - Use diced cooked pork chops, leftover roast pork, or crisped-up bacon pieces for a smoky, savory twist.
Can I Reheat Shrimp And Rice?
I would recommend if you reheat this meal, to do so in the microwave with a splash of water to loosen the rice up. Or, you could reheat it on the stovetop in a frying pan with a tablespoon of oil over medium-high heat just until everything is heated through.
Can You Freeze It?
Yes, you can freeze shrimp fried rice, and it freezes very well. Make sure the rice has cooled completely, then portion it into airtight containers or freezer bags to prevent freezer burn. Freeze for up to 3 months.
When you’re ready to enjoy it, reheat straight from frozen in a skillet, microwave, or air fryer until hot and steaming.
More Delicious Seafood Recipes
- My Keto Air Fryer Shrimp Scampi is a meal that can be on your table in 8 minutes! It’s garlicky, buttery, with a fresh bite of lemon and basil.
- Haddock with Spinach and Rice is a delicious instant pot recipe of mine. The haddock is light and flaky and the meal comes together in under 30 minutes.
- This low carb Shrimp with Cotija and Tomatillos recipe is a flavorful and quick dish that’s full of southwest flavor and is super easy to make!
- And if you’re looking for more great rice recipes, check out my Wild Rice Pilaf ! This dish is rich with flavor and is loaded with delightful veggies.
- This Keto Shrimp And Grits gives you all that savory goodness you expect from a southern classic without all the carbs!

Air Fryer Shrimp Fried Rice | Easy Shrimp Fried Rice Recipe
Equipment
- PHILLIPS AIR FRYER
- 6 x 3 FAT DADDIO BAKING PAN
Ingredients
For the Shrimp
- ▢ 1 pound ( 453.59 g ) Shrimp , peeled and deveined
- ▢ 1/4 teaspoon ( 1/4 teaspoon ) pepper
- ▢ 1 teaspoon ( 1 teaspoon ) Cornstarch
For the Rice
- ▢ 2 cups ( 316 g ) Cooked Rice
- ▢ 1 cup ( 140 g ) Frozen Peas and Carrots , thawed
- ▢ 1/4 cup ( 25 g ) Chopped Green Scallions , chopped
- ▢ 3 tablespoon ( 3 tablespoon ) sesame oil
- ▢ 1 tablespoon ( 1 tablespoon ) soy sauce
- ▢ 1/2 teaspoon ( 1/2 teaspoon ) Kosher Salt
- ▢ 1 teaspoon ( 1 teaspoon ) pepper
For the Eggs
- ▢ 2 large ( 2 large ) Eggs , beaten
- ▢ 1/4 teaspoon ( 1/4 teaspoon ) Kosher Salt
- ▢ 1/4 teaspoon ( 1/4 teaspoon ) pepper
Instructions
Combine shrimp with salt and cornstarch. Set aside.
In a 6 x 3 heatproof pan, mix together the rice, vegetables, onions, sesame oil, salt, and pepper.
Cook in the Air Fryer at 350° for 15 minutes. Toss the rice halfway through cook time.
Place shrimp on top of rice and cook in Air Fryer at 350° for 5 minutes.
While the shrimp cooks beat the eggs with salt and pepper. Pour the eggs on top of the shrimp and rice mixture and cook another 5 minutes at 350°.
Stir the eggs into the shrimp and rice and serve.
This shrimp and rice recipe will store in the refrigerator for about 2 days.
It is best to use leftover rice to make any stir fry recipe.
Use frozen shrimp that is already peeled and deveined for quicker cooking.
If you are allergic to shrimp, you can use diced chicken breasts or thighs and follow the recipe.
Get support & connect with our community on Facebook!
Nutrition

If you already signed up, you should have received an email with a password to give you unlimited access to our FREE Printable Library. The password is case sensitive. Enter it below and get printing!
Password:

Air Fryer Shrimp Fried Rice | Easy Shrimp Fried Rice Recipe
Ingredients
For the Shrimp
- 1 pound Shrimp peeled and deveined
- 1/4 teaspoon pepper
- 1 teaspoon Cornstarch
For the Rice
- 2 cups Cooked Rice
- 1 cup Frozen Peas and Carrots thawed
- 1/4 cup Chopped Green Scallions chopped
- 3 tablespoon sesame oil
- 1 tablespoon soy sauce
- 1/2 teaspoon Kosher Salt
- 1 teaspoon pepper
For the Eggs
- 2 large Eggs beaten
- 1/4 teaspoon Kosher Salt
- 1/4 teaspoon pepper
Instructions
Combine shrimp with salt and cornstarch. Set aside.
In a 6 x 3 heatproof pan, mix together the rice, vegetables, onions, sesame oil, salt, and pepper.
Cook in the Air Fryer at 350° for 15 minutes. Toss the rice halfway through cook time.
Place shrimp on top of rice and cook in Air Fryer at 350° for 5 minutes.
While the shrimp cooks beat the eggs with salt and pepper. Pour the eggs on top of the shrimp and rice mixture and cook another 5 minutes at 350°.
Stir the eggs into the shrimp and rice and serve.
This shrimp and rice recipe will store in the refrigerator for about 2 days.
It is best to use leftover rice to make any stir fry recipe.
Use frozen shrimp that is already peeled and deveined for quicker cooking.
If you are allergic to shrimp, you can use diced chicken breasts or thighs and follow the recipe.
Air Fryer Shrimp Fried Rice | Easy Shrimp Fried Rice Recipe https://twosleevers.com/air-fryer-shrimp-fried-rice/


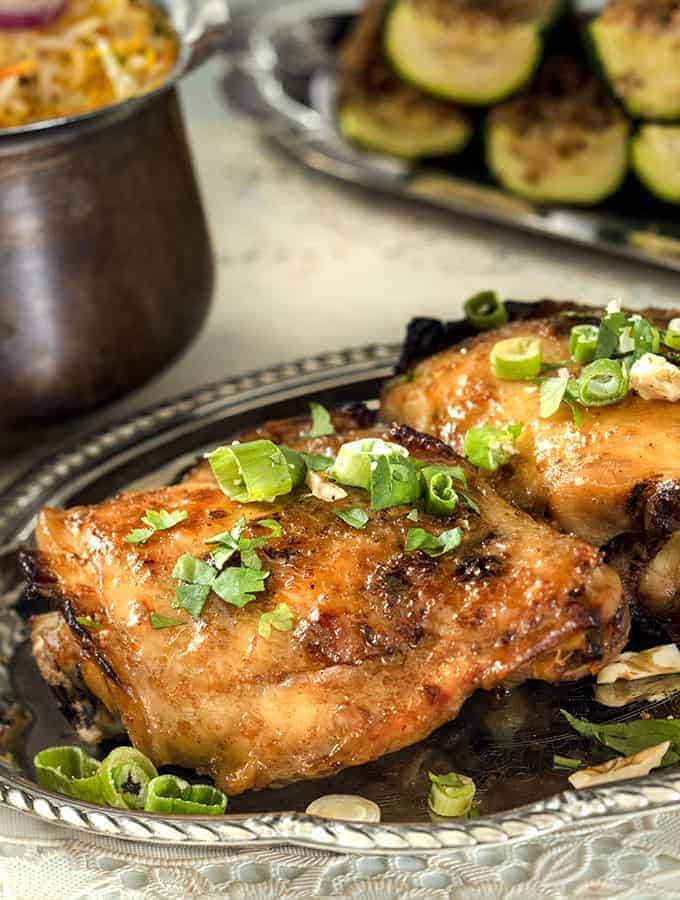
Thai Peanut Chicken is a Thai-inspired air-fryer chicken dish made with chicken thighs coated in a creamy peanut sauce with peanut butter, sriracha, soy sauce, Thai sweet chili sauce, lime juice, garlic, and ginger. It’s quick and weeknight-friendly and works well for an easy low-carb dinner you can serve over rice or veggie noodles. Unlike classic chicken satay recipes that require skewers and grilling, this version air-fries the chicken and uses the peanut sauce as both a marinade and a dip for big satay-style flavor with way less work.

What Makes This Air Fryer Thai Peanut Chicken So Good
This Peanut Chicken is reminiscent of Chicken Sata , but with a lot less work . A typical Chicken Satay takes a while to make, mainly because of threading the chicken onto skewers, etc.
My recipe takes only 35 minutes from start to finish and requires no skewers to wash later!
Pair it with a salad for low carb or with steamed rice for a great dinner.
Speaking of less work, feel free to double the sauce ingredients and save half for up to a week in the refrigerator.
The sauce in this Peanut Chicken recipe is so good you’re going to want to put it on everything, and you absolutely should.
Marinate your favorite meat and vegetables in it, air fry, and dinner is ready. Simple, painless and quick, which is just the way I love to cook.
This Thai Peanut Chicken recipe is that it’s a nice break from the typical and bland chicken recipes that tend to dominate the dinner table.
The peanut butter in this chicken recipe makes it very kid-friendly which means one dinner for everyone at the table. Just adjust the sriracha as needed.
But there’s really only one way to test that theory, so let’s get to cooking!
What Does Thai Peanut Chicken Taste Like?
Thai Peanut Chicken has a rich, savory-sweet flavor with a perfect balance of nutty, tangy, and mildly spicy notes. The creamy peanut sauce gives it a deep, roasted nuttiness, while ingredients like soy sauce or fish sauce add umami depth.
A touch of lime juice or rice vinegar brightens the dish with acidity, cutting through the richness of the peanut butter. The garlic and ginger bring warmth and aromatic spice.
Altogether, it’s a flavorful harmony of sweet, salty, spicy, and tangy. It has a comforting, flavor like peanut butter, but layered with vibrant Thai flavors that makes it one of our best air fryer chicken recipes .
Ingredients You’ll Need
- 1/4 cup Creamy Peanut Butter - The heart of the sauce, peanut butter gives it a rich, nutty flavor and creamy texture that coats the chicken perfectly.
- 1 tablespoon Sriracha Sauce - Adds a bold, spicy kick that balances the sweetness of the peanut butter and chili sauce. You can increase or reduce the amount depending on your preferred heat level.
- 1 tablespoon Soy Sauce - Provides umami and saltiness, grounding the sauce with savory depth.
- 2 tablespoons Thai Sweet Chili Sauce - Brings sweetness and mild heat with a subtle tang, giving the dish that signature Thai flavor.
- 2 tablespoons Lime Juice - Adds acidity and brightness, cutting through the richness of the peanut butter for a balanced taste.
- 1 teaspoon Minced Garlic - Enhances the sauce with a warm, aromatic note that complements the peanut and chili flavors.
- 1 teaspoon Minced Ginger - Adds a fresh, slightly spicy zing that brightens the sauce and gives it an authentic Thai flair.
- 1/2 teaspoon Salt - Rounds out the flavors and enhances both the savory and sweet elements of the sauce.
- 1/2 cup Hot Water - Helps thin the peanut sauce to a smooth, pourable consistency that evenly coats the chicken.
- 5-6 teaspoons Cilantro - Adds a burst of fresh, herbal flavor and color that contrasts beautifully with the rich sauce.
- 1/4 cup Chopped Green Scallions - Lends a mild oniony freshness and crunch to each bite.
- 2-3 tablespoons Crushed Peanuts - Provide a satisfying crunch and extra nutty flavor that complements the creamy sauce and tender chicken.
How to Make Air Fryer Thai Peanut Chicken
- Mix Marinade. Mix together the peanut butter, sriracha, soy sauce, sweet chili sauce, lime juice, and salt. Pour in the hot water and mix until you have a smooth mixture.
- Marinade Chicken . Place the chicken in a zip-top bag . Pour in half of the sauce and mix until the chicken is well coated. If you have the time, allow the chicken to marinate for 30 minutes or up to 24 hours in the refrigerator.
- Prepare to cook . Remove the chicken from the bag with as much of the sauce mixture as possible and place it in the air fryer basket.
- Air Fry . Set the air fryer to 350F for 20-22 minutes or until the chicken thighs are heated 165F at their thickest part.
- Garnish . Garnish with cilantro, onion, and peanuts. Serve with the rest of the sauce for dipping.
Tips And Tricks
If you want your Thai peanut chicken to turn out irresistibly flavorful and perfectly cooked every time, a few simple tips and tricks can make all the difference.
- Don’t Freeze . I wouldn’t suggest freezing this, once made, and saving it for later. It’s best eaten right after it’s finished cooking. It will keep in the fridge for a couple of days in an airtight container. However, the reheating won’t be kind to the taste of the chicken. So although good, it’s not as good as it was right after cooking.
- Leftovers in salad. Now if you wanted to use sliced up leftovers in a salad? Drizzled with a little extra peanut sauce for dressing? Go for it. Perfection!
- Control Spices. If you don’t like spicy foods, simply reduce the Sriracha sauce . I prefer the flavor of it though, especially for this dish. So I suggest at least leaving a bit in the recipe for flavor’s sake.
- I used this sweet chili sauce for this recipe, but any sweet chili sauce should work fine.
Variations
If you love the bold, nutty flavors of Thai peanut chicken, there are several delicious ways to customize and elevate this dish to suit your taste and dietary preferences. Here are some of our favorites:
- Chicken Breast - Use boneless, skinless chicken breasts for a leaner option. Just be careful not to overcook, they cook faster than thighs.
- Vegetables - Add sautéed bell peppers, snap peas, or shredded carrots for color, crunch, and extra nutrition.
- Tofu or Tempeh - For a vegetarian version, swap chicken with firm tofu or tempeh; the sauce clings beautifully to these proteins.
What To Eat With Air Fryer Thai Peanut Chicken
If you’re serving Thai peanut chicken and want a complete, flavorful meal, pairing it with the right sides can take it to the next level.
- Jasmine Rice - The fragrant, slightly sticky rice soaks up the rich peanut sauce perfectly.
- Cauliflower Rice - A low-carb alternative that keeps the meal light while still pairing beautifully with the sauce.
- Stir-Fried Vegetables - Broccoli, bell peppers, snap peas, and carrots add crunch, color, and freshness to balance the richness of the chicken.
- Noodles - Rice noodles or soba noodles tossed lightly with sesame oil make a hearty, satisfying base for the chicken.
How Long Does It Last?
Air fryer Thai peanut chicken can be safely stored in the refrigerator for up to 3 to 4 days when kept in an airtight container. The rich peanut sauce helps preserve the moisture and flavor of the chicken, but over time the texture may become slightly firmer as it cools.
To enjoy it at its best, reheat the chicken gently in the air fryer at a lower temperature or in the microwave until warmed through
Can You Freeze It?
Yes, you can freeze Thai peanut chicken to extend its shelf life and enjoy it later. To do so, allow the chicken to cool completely after cooking, then place it in an airtight, freezer-safe container or heavy-duty resealable freezer bag.
Frozen Thai peanut chicken can last for up to 2 to 3 months without a significant loss of flavor or quality. When ready to eat, thaw the chicken in the refrigerator overnight and gently reheat in the air fryer
Air fryer Thai peanut chicken can be spicy, but it’s very adjustable. Most of the heat comes from sriracha and Thai sweet chili sauce, while the peanut butter + soy sauce + lime juice base keeps the flavor more sweet-salty-tangy than fiery. For a mild version, reduce or skip the sriracha and use a milder sweet chili sauce. For more heat, add extra sriracha (or a pinch of chili flakes) and finish with a spicy drizzle. Either way, serving it with jasmine rice or cauliflower rice and cooling sides like cucumber salad helps balance the spice.
Yes, you can use chicken breast instead of thighs for air fryer Thai peanut chicken, but it’s leaner, so it can dry out faster. To keep air fryer Thai peanut chicken breast juicy, cut the breast into even pieces (or use tenders), cook at a slightly lower temp or for less time, and pull it as soon as it hits 165°F. Also, to prevent the peanut sauce from burning, use it mainly as a marinade and brush on extra sauce near the end (or toss after cooking) so you still get that creamy Thai peanut sauce chicken flavor without scorching.
Yes, you can use almond butter instead of peanut butter in Air Fryer Thai Peanut Chicken, and it still makes a delicious creamy peanut-style sauce, just with a slightly milder, nuttier flavor. For the best texture, use smooth almond butter and thin the sauce as needed with a splash of water or coconut milk, then balance the flavor with soy sauce (or tamari for gluten-free) and extra lime juice since almond butter can taste less punchy than peanut butter. If your almond butter is unsalted or very natural, you may need a bit more seasoning (and a touch of sweet chili sauce or keto sweetener if you’re going low-carb) to keep that classic sweet-salty-tangy Thai profile.
Looking For More Great Thai Dishes?
- It’s so easy to make these Air Fryer Cornish Game Hens ! This recipe features the beautiful flavorings of Thai Gai Yang and will be a recipe you’ll want to make over and over again.
- This Instant Pot Slow Cooker Thai Green Curry is a perfect, authentic Thai curry with chicken and vegetables.
- This Thai Coconut Pandan Custard is a delicious treat that’s Keto, Low Carb, and is all made in your Instant Pot!
And if you’re looking for something with a little more heat, check out my Bang Bang Shrimp ! This dish is hot, delectable and easy to make in your air fryer!

Air Fryer Peanut Chicken
Equipment
- Ninja Air Fryer
- Silicone Tongs
Ingredients
- ▢ 1 pound Bone-in Skin-on Chicken Thighs
For the Sauce
- ▢ 1/4 cup Creamy Peanut Butter
- ▢ 1 tablespoon Sriracha Sauce , (adjust for your spice needs)
- ▢ 1 tablespoon Soy Sauce
- ▢ 2 tablespoons Thai sweet chili sauce
- ▢ 2 tablespoons lime juice
- ▢ 1 teaspoon Minced Garlic
- ▢ 1 teaspoon Minced Ginger
- ▢ 1/2 teaspoon Kosher Salt , to taste
- ▢ 1/2 cup hot water
For the Garnish
- ▢ 5-6 teaspoons Cilantro , finely chopped
- ▢ 1/4 cup Chopped Green Scallions
- ▢ 2-3 tablespoons crushed peanuts
Instructions
Mix together peanut butter, sriracha, soy sauce, sweet chili sauce, lime juice, and salt. Pour in the hot water and mix until you have a smooth mixture.
Place the chicken in a zip-top bag . Pour in half of the sauce and mix until the chicken is well coated. If you have the time, allow the chicken to marinate for 30 minutes or up to 24 hours in the refrigerator.
Remove the chicken from the bag, bringing with it as much of the marinade as you can. Place the coated chicken in the air fryer basket.
Set the air fryer to 350F for 20-22 minutes or until the chicken thighs are heated 165F at their thickest part.
Garnish with cilantro, onion, and peanuts. Serve with the rest of the sauce for dipping.
Don’t Freeze . I wouldn’t suggest freezing this, once made, and saving it for later. It’s best eaten right after it’s finished cooking. It will keep in the fridge for a couple of days in an airtight container. However, the reheating won’t be kind to the taste of the chicken. So although good, it’s not as good as it was right after cooking.
Leftovers in salad. Now if you wanted to use sliced up leftovers in a salad? Drizzled with a little extra peanut sauce for dressing? Go for it. Perfection!
Control Spices. If you don’t like spicy foods, simply reduce the Sriracha sauce . I prefer the flavor of it though, especially for this dish. So I suggest at least leaving a bit in the recipe for flavor’s sake.
I used this sweet chili sauce for this recipe, but any sweet chili sauce should work fine.
Get support & connect with our community on Facebook!
Nutrition
And don’t forget to check out my air fryer cookbooks! Every day easy air fryer , and Air Fryer Revolution .

